We use cookies to make your experience better. To comply with the new e-Privacy directive, we need to ask for your consent to set the cookies. Learn more.

How to adjust overlocker tensions and get the right stitch balance?
Each thread on an overlocker has its own tension dial. These dials increase or decrease the amount of pressure on the thread. We are looking to find the perfect balance for these thread tensions and balance, between the needle threads and looper thread tensions.
How to balance overlocker tensions?
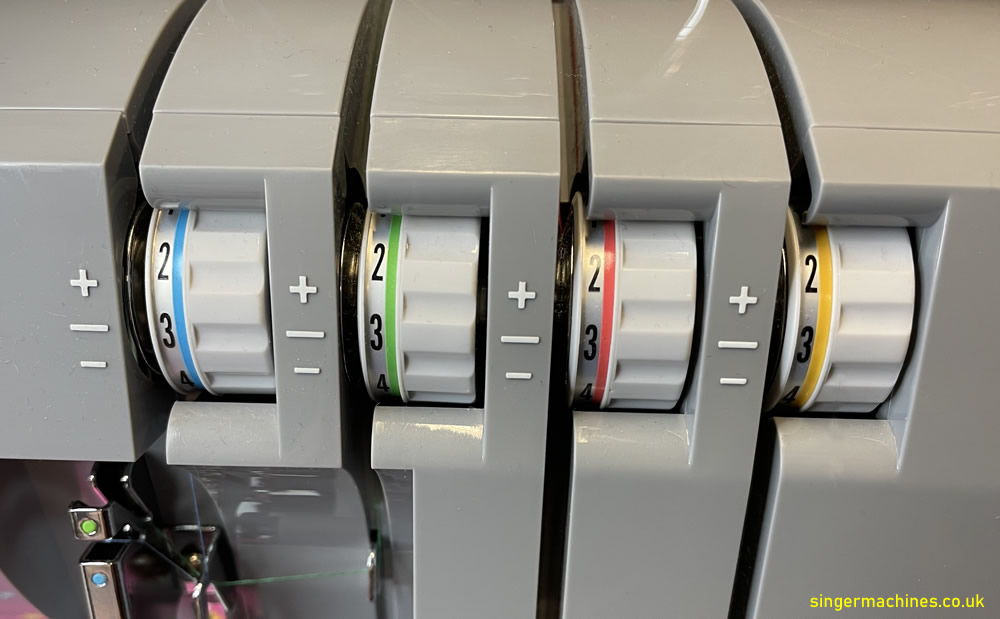
We will be using a Singer heavy duty for this demonstration to show, how to balance the tensions on a 4-thread overlocker, as you can see from the images below,.
Each thread tension dial has colour coded threading paths:
- Tension 1 - Left needle - Blue
- Tension 2 - Right needle - Green
- Tension 3 - Upper looper - Red
- Tension 4 - Lower looper - Yellow
We will be using the same thread colours as the tension dials.
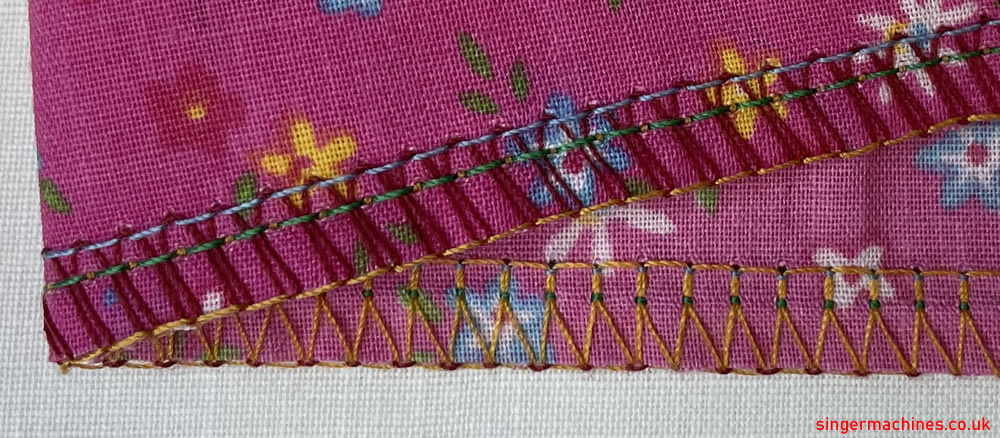
The perfect stitch should look like this fabric sample below. Each thread looks relaxed and perfectly formed stitches can be seen.
The top of the fabric and upper looper thread are perfectly interlocking with the lower looper threads, just on the fabric edge. Good balance between looper threads.
The needle threads are laying straight, and only a tiny stitch can be seen on the rear of the fabric, as it catchs the lower looper thread.
The thread tensions should not be too loose or too tight. This is exactly what we are looking to achive.
This next image below shows the thread tension is not balanced:
The lower looper thread (yellow) is encroaching on to the top side of the fabric.
The stitch balance between the loopers is not correct. Let’s fix it.
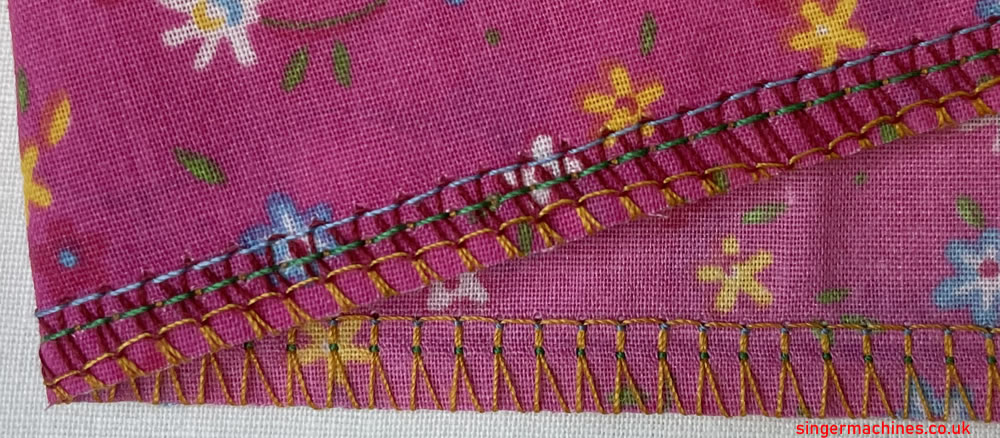
Loosen the tension on the upper looper (third tension dial) or tighten the tension on the lower looper thread (forth tension dial).
Looking at the sample, note the uneven, wave effect the lower looper thread is making! It is also not pulling at the fabric edge at all..! On this occasion, tighten the lower looper tension. This will pull the top thread to interlock nearer the fabric edge. Sew another sample and keep repeating until the threads balance and meet on the edge of the fabric.
When adjusting the tension settings, only adjust one at a time, rotate the dial, one hole-number at a time, or about 30 degrees if there is no numbering system. Use this as a starting guide adjustment, then sew a test sample again. Fine tuning can be done in smaller rotations of the tension dials.
Only use thread of the same type and brand, use new needles and double check the overlocker is threaded correctly as per the user guide. Making sure every loop, or pig-tail thread guide has the correct thread colour running through it. Use a soft cotton (light to medium weight material for testing sewn samples), in as plainer colour as possible, so every stitch can be seen clearly.
Whilst testing and perfecting the tension balance, use the same thread colour as the overlock thread tension dial indicates, making it much easier to adjust the correct tension dial for the thread that is unbalanced.
Remember, when your overlocker is stitching just as you want it too, you can mark the tension dials, in this correct position! maybe with a dab of nail varnish and the next time you pull it out for your next stitching task, zoom straight back to these self-marked settings and start stitching again.